Step By Step Application WALK-THROUGH

The following guide will teach you how to submit an application through the HFD Provider Portal. All screenshots you see are based off of a test provider account with standard settings. Your screen may look slightly different based on your enabled settings.
Overview
The application process has 5 steps:
- Apply
- Service and service cost
- Terms
- Payment
- Agreement
The Apply step is the longest of the five, as we must collect all patient information to make the approval decision. After we assess the risk, we basically just need to know the service they are signing up for, how much that service costs, how long of a term they want to sign up for, and the payment information they are going to use.
Before you start, choose your application type..
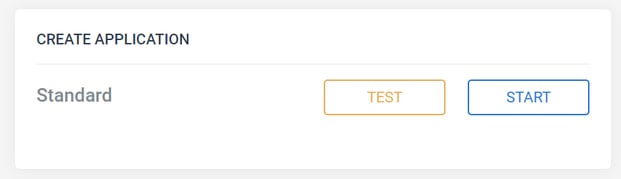
The first thing you will see when you hop into the Provider Portal is a section labeled “Create Application.” Inside that section, you will see the ability to start a real or test application. The test application is very handy when you are training new team members – we highly encourage you use it!
Step 1: Apply
In this step, you will need to gather general, contact, and office information. After this step, you will know whether or not they are approved declined, or sent to our Credit Review team, an HFD department that takes a closer look into the patient’s history. This is by far the longest step of the process. Steps 2-5 will be much faster.

1. Down Payment Information
- Question “Have you already received a down payment from the person receiving services?” – If you collected cash from the patient and alleviated your risk already, HFD will not prompt a higher down payment in the coming steps. Their down payment requirements will be effected in the coming steps based on the amount of cash collected from the patient up front.
- Finance Partner – In the case your patient was partially approved or declined by lender and you want to fully track the total balance from the start, HFD allows you to enter the previously collected down payment or the finance partner declination code.
2. Applicant Information

- Question “Is the applicant the person receiving services?” – If a parent is applying for their child, HFD wants to know the name of both the parent and the person receiving services. This helps HFD during delinquent account servicing.
- Question “Does the applicant have a bank account?” – If the applicant does not have a bank account, a co-applicant will be required.
- Email – We HIGHLY recommend collecting email. Collection rates are far better for patient’s that have an email. If the applicant does not have an email, we encourage you ask for the email of a close family member.
- Note: Email is required for e-signatures. If email is not collected, you will be required to gather a hard signature and fax in the agreement.
- Employment Information – We collect this information to gauge their consistency. If they have been at the same house or apartment for an extended period of time, we can assume they are fairly reliable. Collecting this information reduces your risk of financing a patient with a higher likelihood of going delinquent.
3. Co-applicant Information (Optional)
- Adding a co-applicant requires all information that the applicant gave. We will run a soft-check credit pull on the co-applicant, which means we need all of the information to do so.
4. Office Information
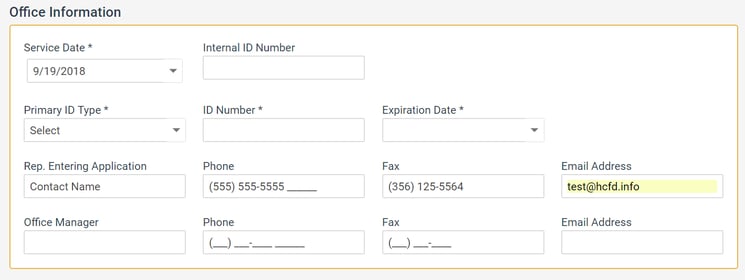
- Service Date – This is the date of procedure or treatment. We know not to collect on the account until after this date (and you have activated the account – explained ahead).
- Internal ID Number – If you manage your patients in an in-house CRM, enter their unique ID into the Internal ID Number field so that you have something to map it against. This is not an HFD required field, rather a field that you can utilize for your own purposes.
- Rep and office information – The rest of the fields are for your company’s use as well. Utilize these fields to always know who submitted them.
Step 2: Service and Service Cost
Now that you know the patient has been approved, you will need to set how much the procedure or treatment will cost. Setting up custom services allow you to allocate designated costs to each service you provide so that there is no need to guess.
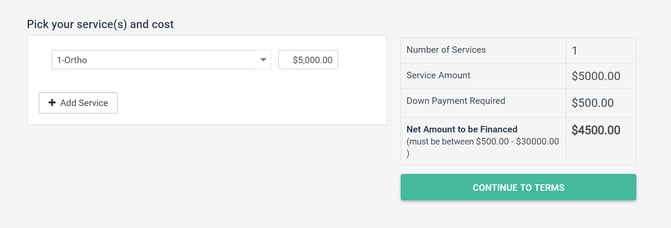
1. Pick your service
- You will see that each service has a dedicated cost assigned to it. These services and service costs are set by you. You can add up to 5 services.
- Frequently Asked Question : Why would I want to add two service? – Sometimes there is more than one thing that a patient wants to finance. For instance, what if they need two root canals? This would be possible by adding two instances of “Root Canal” in the services drop-down.
2. Type the cost
- Though each service has a dedicated cost assigned to it, you can always override the cost with a custom amount.
- The down payment is determined based on the credit grade they received in the Apply step.
- HFD has a minimum and maximum amount financed, which you see in the bottom row of the table on the right.
3. Continue to terms
Step 3: Terms
Now that the cost is determined, the patient can choose how many months they want to finance the cost over. Their monthly payment is contingent on the amount of months they want to choose.
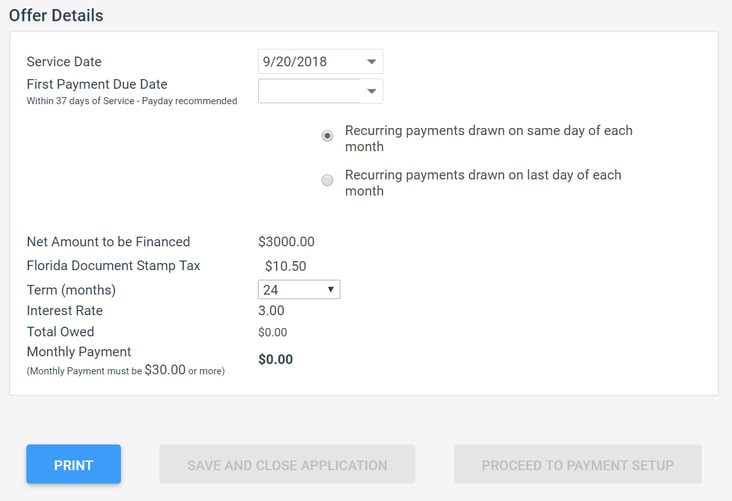
1. Confirm the Service Date
- The service date is the procedure or treatment date. In many cases, the day the patient received it will change.
2. Select the First Payment Due Date
- Whatever day of the month they choose will be the same day we charge them moving forward. They can always change their payment due date through their patient portal.
3. Choose the term length
- Every time you change the term length, the monthly payment will adjust. This allows you to work with your patient to back into a monthly payment that works best for them.
- Note: Selecting a high term length may cause the monthly payment to drop below the minimum monthly payment amount depending on the overall cost of the service. You must select a term that satisfies the monthly payment requirement.
4. Save for later or Proceed to Payment Setup
- We do provide the option to save and return to add the payment information and gather signature. We recommend you gather as much information as possible while you have them with you to prevent drop off but certain workflows may require you collect the rest later.
Step 4: Payment
All that’s left is to gather a payment method from the patient and collect their consent to charge each month. We are happy to allow Checkings, Savings, Credit, Debit, and HSA/FSA.
Note: We do support Health Savings Accounts for approved providers. If this option is not available for you, please contact HFD to get approved.
1. Primary Payment Method
- A primary payment method is required in order for the account to be activated and HFD to begin collecting from the patient after the service was conducted. This payment method will be on their agreement that they sign in the next step.
2. Secondary Payment Method (Optional)
- Though this is not a required step, we highly recommend gathering a secondary payment method.
3. Provider Acknowledgement
- Since you are the one entering the information and not the patient, we must acknowledge that you were the one that did everything necessary.
4. Finish
- Save and Close – Choose this option if you would like the patient to sign the agreement later. You can always come back to this step through the patient account.
- Save & E-Sign Documents – Choosing this step will trigger the e-sign process. Continue to the next step for instruction on this.
Step 5: Signature
This is the last step! We have all the information we need to service this account and give them the best payment plan experience – except their approval to do so. You can do this by executing one of two options: Hard signature with fax or e-signature through email.
E-Signature Through Email:
1. Click “Save & E-Sign Documents”
- Clicking this button should trigger a pop-up window that explains how the process works so that you can explain it to the patient.
2. Add or edit applicant email address
3. Click “Send Doc To Applicant”
4. Allow patient to use the computer or access their email through their smartphone or tablet
Hard Signature and Email
1. Click “Download Agreement”
2. Have the patient sign the document and initial where necessary.
3. Scan agreement and email to [email protected].
That’s it!
You are cleat to provide the service to your patient! Once it has been performed, don’t forget to activate the account!